Photobucket Photobucket Photobucket Photobucket
Showing posts with label birthday party. Show all posts

May 26, 2013

Karen "Willy" Okonkwo's 25th Birthday Party

 As you all saw last year with my Kare Bear's 24th Birthday Slumber Party, I am obsessed with celebrating my birthday. This year was no different so I decided to go with a fun Willy Wonka theme for my 25th birthday celebration. It is so important to map out your birthday, making sure to ignite all five senses during your party so it is the best experience for your guests. Instead of calling it a Willy Wonka party, I did a spin off of the name and called my 25th Birthday 'Karen "Willy" Okonkwo's 25th Birthday Party'. Much like in the movie, all invitees had to "find" a golden ticket to be officially invited to my birthday. I used a popular Australian graphic designer called Crackers Art to create chocolate candy bar invitations that I turned into candy bar wrappers and golden tickets. They turned out amazing! To make the RSVP process more interactive, I asked each guest on the golden ticket to RSVP by uploading a picture of their golden ticket to whatever social media outlet they use and to tag me in it with the caption " I found the golden ticket!" This made the invitations that much more exclusive!

I decided to host my party in beautiful Miami! To make sure I captured every moment of it, I left a welcome letter for all of my guests when they checked into the hotel we were staying at that asked them to hash-tag any photos taken during the trip with #karens25thbday. I highly recommend making a hash-tag for any event that you are hosting because it is so much fun to look back at all the pictures that all of your guests snapped!

First up on the itinerary was the most fitting event of all: visiting the Chocolate Factory! No Chocolate Factory Tour can be complete without Willy Wonka gear so before the trip I ordered a Willy Wonka costume. On top of the costume, I just had to order candy and have a mini candy buffet so I ordered candy from my favorite candy store: Oh! Nuts. To make the entire experience complete, I had a custom cake made by Divine Delicacies Custom Cakes in Miami. This company can make ANY cake possible and they have catered to every celebrity you can think of from Drake to Pitbull to the Miami Heat stars. I gave them the graphic design of the "Okonkwo Bars" I sent out to my guests and they replicated that image into a delicious vanilla rum cake topped with butter cream frosting and fondant {yum}! Schakolad Chocolate Factory in Miami Beach, FL hosted my Chocolate Factory Tour and it was a blast! All of us received a tour of the Chocolate Factory learning the ins and outs of chocolate. Best of all, we got to make 3 different types of chocolate treats and take it home!


All in all, my 25th Willy Wonka themed birthday party in Miami, FL was so much fun and I can't wait to show you all what I come up with for next year's birthday theme. If you have any questions on how I created any part of this party, please feel free to contact me at partywithak@gmail.com!

October 20, 2012

Kare Bear's 24th Birthday Slumber Party: Balloon Arch

As inspiration from my blog entry, Props till you Drop, I really wanted to activate sight for my guests attending my birthday slumber party. I knew the entrance of my party would be the high focal point, so I solicited Nohelly Mendoza of Partyland Special Events in Chandler, AZ to help me make a picture perfect balloon arch for my Kare Bear (Care Bear themed) 24th Birthday Slumber Party.

What do you think? I think it looked just like the cloud entrance at the beginning of the show! Love it!


"Do the Care Bear Count down, 5, 4, 3, 2, 1!"

July 7, 2012

A "Minnie" Occasion


I have always wanted to have a Minnie Mouse themed party, so I decided to use my birthday as the perfect excuse to have one. Now, I had devoted so much time to my Kare Bear 24th Birthday Slumber Party, that it only left me with a few days to put some decor together. When I say a few days, I mean less than 24 hours before my Minnie Mouse themed event!! Here's how you can decorate for a simple Minnie Mouse themed birthday party in less than 24 hours!


The first step in planning a Minnie Mouse themed party is to decide what colors you would like to work with. There are two different colored hair bows that she wears: red & pink. Be it that I am one of the most indecisive people, I decided to use both colors incorporating white & black as accent colors.

Now that you have the colors picked out there are three places you must visit to complete the Minnie Mouse look: Party City (or your closest party store), Michaels (or your closest craft store), and a candy or grocery store near you.

Items to retrieve at the Party Store:
  • 25 balloons (red, pink, black, & white)
  • Set of ribbon
  • Helium tank
  • Minnie Mouse paper hats
  • Minnie Mouse ears
  • Red, black, pink, & white streamers
    
Mayflower Balloons 44227 Minnie Mouse Bouquet (Google Affiliate Ad)

Items to retrieve at Michaels:
  • A set of polka dotted paper that includes red, pink, and black
  • A set of pink and red paper
  • Polka dotted ribbon that has red and pink as the base with the polka dots white
  • Red & pink candy bags
  • Minnie Mouse stickers
  • Assorted glass jars (medium to small in size)
  • Bag of gems that include pink & red
  • Ready-to-stick black letters
  • White, red, pink, and black paper lanterns

Items to retrieve at the candy store or grocery store:
  • Red, pink, white, and black candy or assorted loose candy that can easily be poured into glass jars.
  How to Use What You've Got!

So you have all your supplies, now it's time to put them together! Below are a couple ways in which you can decorate your party.

Minnie Face

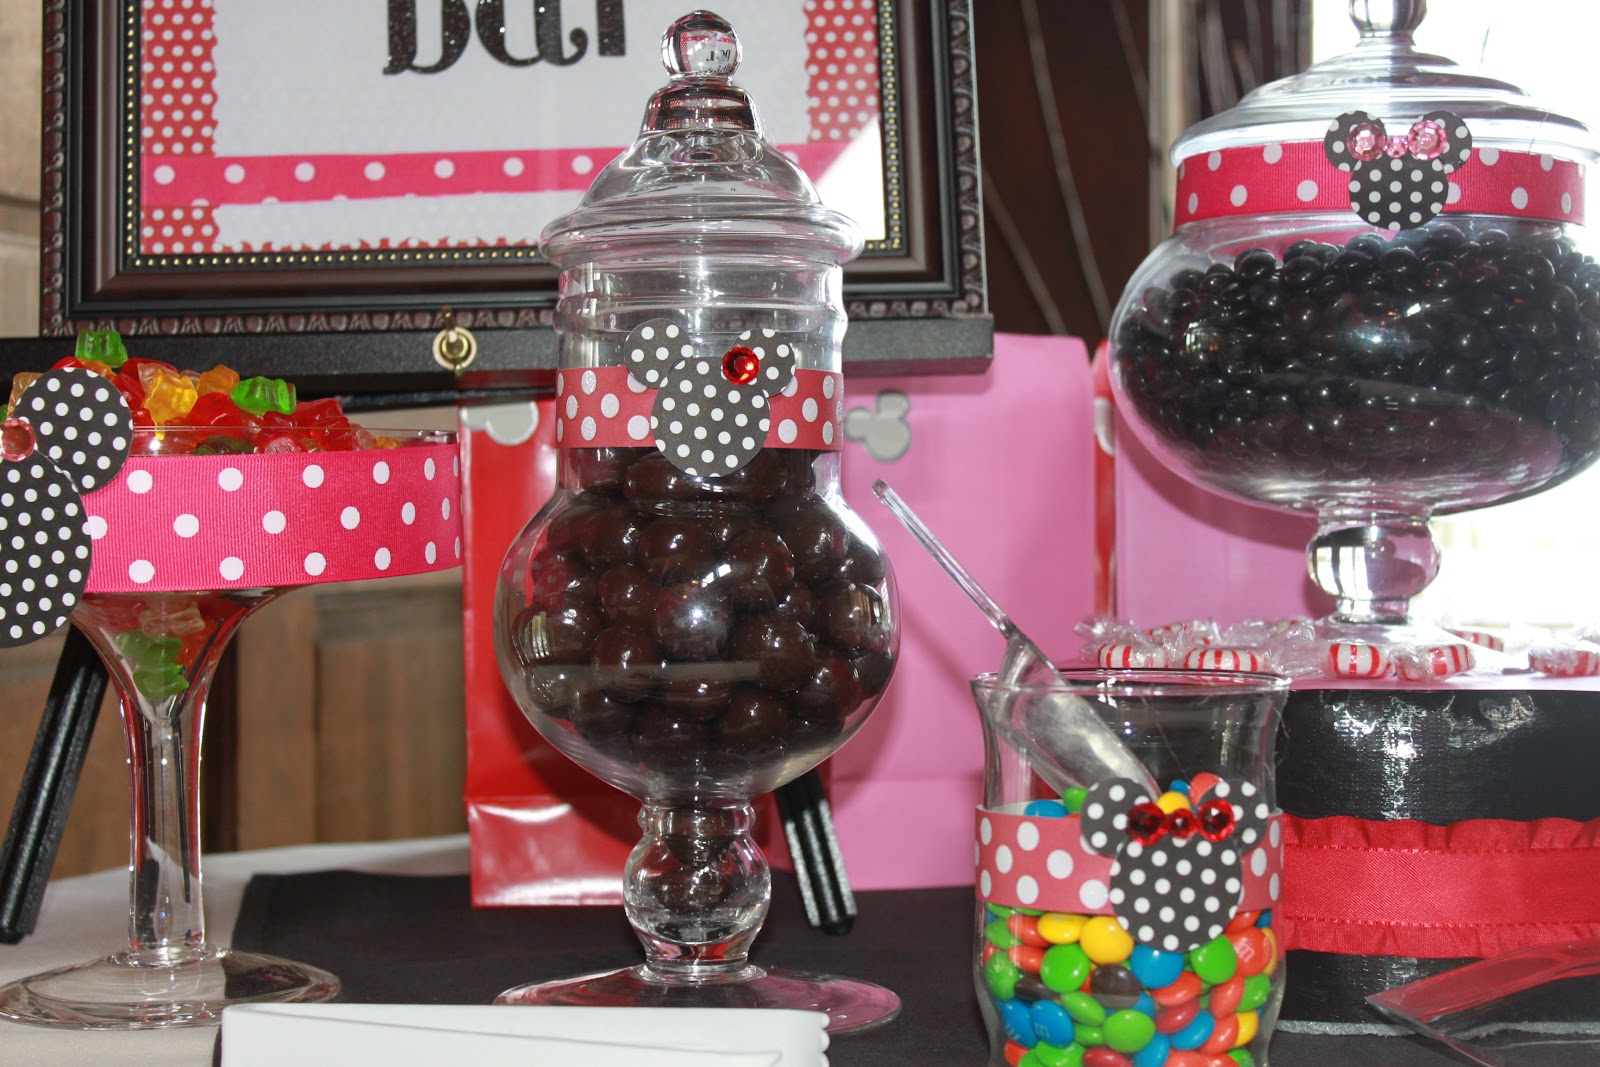
The quickest way to decorate your party fitting to the theme is to make Minnie faces that can be placed throughout the party. Simply take your black with white polka dot construction paper, a bowl, and a pencil, and trace the large part of the bowl onto the paper. With a smaller circular shape, trace it onto the same paper. These circles will serve as a face and ears. Take your red, pink, or red/pink polka-dotted and cut it into a bow.Affix a cute button or cotton ball in the middle of the bow and you're Minnie face is complete. Glue a

Glue a Popsicle stick to the back of the Minnie face and stick it into styrofoam so it can serve as a center piece. OR, string fishing line through the top of the face and hand the Minnie faces from the ceiling.

Paper lanterns

Hang these from a ceiling and even cuter, place Minnie ears on it!

 
Candy Buffet 

With your candy jars, fill them with candy! Affix cute Minnie Mouse stickers and ribbon to the jars and candy bags.


 Of course, don't forget signage!


Table Centerpieces

For all the tables at your party, the remaining paper lanterns, Minnie ears and gems can be placed as table decor. See the picture below for an example.


Balloons

Have fun with these! Couple them in threes with red, pink, and white in one bundle. Strewn them across the room!
                                

ENJOY YOUR MINNIE PARTY :-)


January 19, 2012

Birthday in a Box

Birthday in a Box is like having your own personal party planner: YOURSELF. They make planning a kid's birthday party so simple in but three (3) easy steps:

1) Choose a Theme
2) Personalize It
3) Add Party Favors


I love the selections of themes they have! Moreover, they provide you with different tabs to order additional items such as invitations, party favors, personalized items, decorations, and MORE! It's your ONE-STOP shop so you don't miss out on any important details.


If you use Birthday in a Box you're sure to have an impressionable party!

Pin It

January 4, 2012

((((ATTENTION MOMMIES!!!)))

Okay, so now that I've got your attention, look what I found!

This is the absolute cutest way for you to personalize your child's next birthday party. Choose a theme, upload a photo, and your child will most certainly be the center of attention at his or her party ;-)

I can't get over how many party supplies you can personalize right down to plates!


Your child could be the next princess...

Dr. Suess...

or low down, dirty Cowboy! The possibilities are endless!

Check out all the themes you can choose from at CelebrateExpress!

Pin It

December 29, 2011

Birthday Party Idea #1: Red & Chocolate!!

Every year I try to pick a different theme for my birthday. This past year it was 'Mardi Gras Meets Masquerade Ball' themed and this year I have a couple of themes I am choosing from. I will post a couple of ideas I have been inspired by through witnessing many similar party themes. Last night I had an epiphany and I thought "All Things Red". To have a red-themed party would be amazing since red is one of my favorite colors...even more amazing would be the incorporation of my favorite form of candy: CHOCOLATE. Looks like Chris Nease from Celebrations at Home was thinking the same thing!


To find out more details on how she made her Red & 'Chocolate' party come to life click here!

Pin It

June 5, 2011

Birthday Party Places

So you're birthday is coming up and you are at a standstill as to what to do. Make planning your next birthday party a piece of cake by using Birthday Party Reservations.com.


Whether you are looking for birthday party places to go out to or just party planning ideas for your next birthday, they have birthday party places for you! You can browse their selection of Bars, Event Space, Live Music, Lounges, Nightclubs, Restaurants, Novelty Spaces, Outdoor Spaces and Rejuvenating Birthdays by heading over to their birthday party venues page and picking your birthday party places today!

April 24, 2011

How to Plan a Large Birthday Party-Part 5: Give Your Thanks

One of the most important things to do at the conclusion of a party you have hosted is to thank your guests for coming. You should send out thank you notes/cards no later than a week after your party. Since my party was a birthday party I wanted to add a little twist and give each of my guests birthday cake.....Gold Canyon Birthday Cake Candle that is ;-)


Each guest had this candle and a thank you card waiting outside of their hotel door for them. You can ask the hotel to deliver this type of stuff to your guest's rooms and of course you can do it yourself like I did.

So there you have it! To recap you have learned that in order to successfully map out a birthday party for a large group you need to create an itinerary followed by sending out invitations. As you wait for RSVPs, you can start ordering and creating decorations, paying attention to how you can apply minor details to make the party standout. Moreover, we have learned how to handle potential guests who have not RSVP'd and we have captured the importance of how to thank our guests at the conclusion of our party.

I hope this week long blog entry about How to Plan a Large Birthday Party was helpful and you can go out and plan your next large birthday party successfully. If you have any questions or comments please feel free to reach out to me.


XOXO,

How to Plan a Large Birthday Party-Part 4: Dealing with RSVPs

As you are creating your decorations and ordering food and drinks for your large birthday party, you are at a stand still because you do not know how many minor details to make for individual guests and you have no idea how much food & drinks to order. You realize that the RSVP date has long passed and you have not heard from a couple of your guests. You need to hear from them as soon as possible, but you do not want to send them yet another text about the large birthday party around the corner.

Evite is your answer.


Evite is such a great tool to use because it is a friendly way of letting your potential guests know that they have an event to RSVP to. The above image shows an Evite that I sent to some guests who had not RSVPd. Unfortunately, some people do not understand the importance of RSVPing, but this way is the best way to let them know and get an answer quick since a lot of people actively check their emails. All you need are your potential guests' email addresses and then Evite will do all the work! The cool thing about using Evite is that when your potential guests do RSVP, the update gets sent immediately to your email.

April 23, 2011

How to Plan a Large Birthday Party-Part 3: Minor Details

Minor Details tie the whole party together. They are the little, yet BIG things that you add to a party that make it stand out. Below I will show you just some of the minor details I used during my 23rd Mardi Gras meets Masquerade Birthday Party.

Minor Details #1: Welcome Party Bin


For all of my guests' rooms I left them a welcome party bin that included their masks for the party, personalized door hangers with a bag full of candy, more treats, and an itinerary for the weekend.

To make the above door hanger I simply purchased a wooden door hanger from Michaels


I then painted it royal purple with paint also purchased from Michaels, and then adorned it with a cute mini frame. Next, I took the first letter of each guest's name, cut out the corresponding letter from a magazine, and fixed it in the middle of the frame that I glued onto the door hanger. On the back of the door hanger I placed this bag of treats equipped with EBOOST to give them lots of energy for the weekend...


As for the itinerary for the week, I used Vistaprint to design a welcome/itinerary card.


Click here for a continuation on the Minor Details I used for my party!

How to Plan a Large Birthday Party-Part 3: Minor Details CONTINUED

Like I said, Minor Details truly do add to a party! Check out my continuation of some of the decorative ideas I created for my 23rd Mardi Gras meets Masquerade Birthday party below.

Minor Details #2: Mask Cork Board Creation

I really wanted to capture the mask look with my party since masks are a huge part of Mardi Gras and Masquerades. To make this Mask Cork Board Creation you will need the following:

(1) Mask (2) Corkboard (3) Hot glue gun w/ glue sticks (4) Construction paper that matches the color scheme you are using for your party. All of these items can be purchased at Michaels.

To create, evenly align 4 pieces of construction paper onto the cork board-glue accordingly. Find the center of your cork board and position the mask in the middle-glue accordingly. You're done!

Minor Details #3: Mardi Gras Sand Vase


To make this table piece you will need the following:

(1) Mini vases (2) Bag of purple sand (3) Pipe cleaners (assorted colors that match your theme) All of these items can be purchased at Michaels.

To create, take your bag of sand, pour it in the vase leaving about a quarter of an inch to the top free, and then dig the pipe cleaners into the sand. To make it look unique, bend the pipe cleaners in different directions!

Minor Details #4: Mask & Feather Pot


The final picture of this creation is coming soon as I failed to properly upload it. But, the picture to the right gives you a little bit of an idea as to how the final look turns out. To make this Mask & Feather Pot creation you will need the following:

(1) A small clay pot (2) Lots of feathers that match your theme colors (3) hot glue gun with glue sticks (4) wooden tongue sticks (5) small Styrofoam ball (6) Construction paper that matches the theme colors of your party (7) Traceable mask (8) glitter
All of these items can be purchased at Michaels.

To create, take your bag of feathers and separate the single color you want to use on the pot. In this case, I chose the purple feathers and left the remaining two colors for my other pots. Next, I took my hot glue gun and glued the feathers on the outer surface of the small clay pot as well as the inner surface. From there, I took my small Styrofoam ball, cut it in half, and placed it in the inside of the pot.

Separately, I took a traceable cardboard mask found at Michaels and traced it over my desired colored construction paper. Be sure to use a light pencil when doing this. Cutting out only the outer part of the tracing, I proceeded to glue it on top of the traceable cardboard mask. I did this to make the mask more durable. Since there were still light pencil marks from my tracing, I took glue and outlined the eyes and mouth of the mask as well as the inner part of the eyes and mouth with the glue. I then poured glitter on it and waited a couple of minutes for it to dry. Once dry, I glued the wooden tongue stick to the back of the mask and then pressed the wooden tongue stick portion into the Stryrofoam that had been placed into the pot. Mask & Feather pot creation COMPLETE!

Minor Details #5: Mardi Gras Box and Mardi Gras "beads"


I really like to fill up a room with as many minor details as I can! There are two ways in which I did this, one with a box, the second with construction paper. With the above creations you can easily enhance a room.

To make the first Mardi Gras box creation you will need the following:

(1) small cardboard box (2) construction paper that matches the colors of your theme (3) hot glue gun and glue stick (4) ruler

To create, take your ruler and measure the sides of the small cardboard box. Take your construction paper and using the measurements you just obtained, trace out the measurements, varying between different construction paper colors. Cut what you traced and glue it directly onto the cardboard box. COMPLETE!

To create the Mardi Gras "beads" take a cutout punch like the one below


as well as your designated construction paper and slide the construction paper into the cutout punch, punching various colors along the way. Use the circles you punched out as Mardi Gras "beads" and disperse them throughout the party. You can even use them as streamers by punching a tiny hole in them, stringing chicken wire through them, and hanging them on ceilings and walls.

There you have it! These were just some of the ways in which I included Minor Details in my party :-)