


My best friend, Betsy Woulard, is an expert at making diaper cakes so check out the steps she takes to make these wonderful pieces of baby gift art!
How to Make a Diaper Cake
Items Needed:
-75-100 newborn baby diapers( The bigger you want your cake to be the more diapers you need so use discretion. The diaper cake I am describing has three tiers and I used about 100 diapers.)
-An empty paper towel roll
- Large rubber bands
- Ribbon (blue for a boy diaper cake, and of course pink for a baby girl!)
- A baby bottle for topper
- Binkies or any small baby toys that can be easily attached to the cake for extra decorations (optional)
Steps
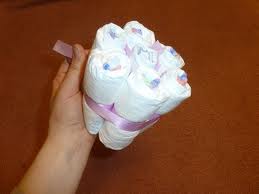
1. Place the empty paper towel roll standing straight up on the floor. TIGHTLY-place one circle of baby diapers around the bottom of the paper towel roll, overlapping the diapers. Continue to do this on top of each circle creating layers. Do this for about three layers then tightly place a rubber band over the layers holding the beginning of the bottom tier onto the paper towel roll securely. This will make it much easier for you to build upon the bottom tier.
Note: It is best to have a friend help you as it gets difficult adding more and more layers to the cake.


2. After your bottom tier is a decent size to your liking, tie a pretty ribbon all along the outside to hold the diapers together. (This bottom tier has to be fairly large as it is the biggest tier and is the base to the entire cake.)
3. Move onto building the next tier directly on top of the bottom tier(base) this is a lot easier as the diapers have something to rest on and this tier should not be quite as big. Just like making the first tier, put a rubber band around the first three layers of diapers to help brace the inside of the cake. After the tier is a good size about 2 inches away from the outside edge of the base tier, tightly tie another ribbon all around the tier to hold together.

4. The top and final tier- follow the same steps by wrapping the diapers around the empty paper towel roll. You can rubber band this tier at the end as it is the smallest tier. Cover the rubber band with another ribbon tying securely.
5. Place a baby bottle at the very top of the final tier, push the bottle slightly down as it should fit in the open hole at the top where the empty paper towel roll is exposed.

6.(Optional) take extra pieces of ribbon and tie binkies or any small baby toy or object around each tier of the cake for extra decor, use a small piece of ribbon to tie to the large pieces that are holding the cake together.

7. Have fun!!!
*If you don't have time to make a diaper cake you can always buy them pre-made! Click on the images below.


soo cute. How come the bottom layer looks like the diapers are angled and in the next photo the diapers look like they were rolled, can you do it either way?
ReplyDeleteHey Megan! YES you can! I wanted to show the both ways in which you can construct the diapers :-)
ReplyDelete<3 it!
ReplyDeleteYour diaper cake is lovely. We make our cakes the same way by using a tube in the center.
ReplyDeleteBrilliant Step by Step. The pictures really helped. If you want to learn How to make more Diaper cakes for baby showers Then Click https://www.etsy.com/listing/189100583/how-to-make-a-diaper-cakes-for-baby
ReplyDeleteThis seems like such a fun project to make!
ReplyDelete